Table of contents
Introduction
In this post, I am going to show another way to achieve the design of Nested Layout.
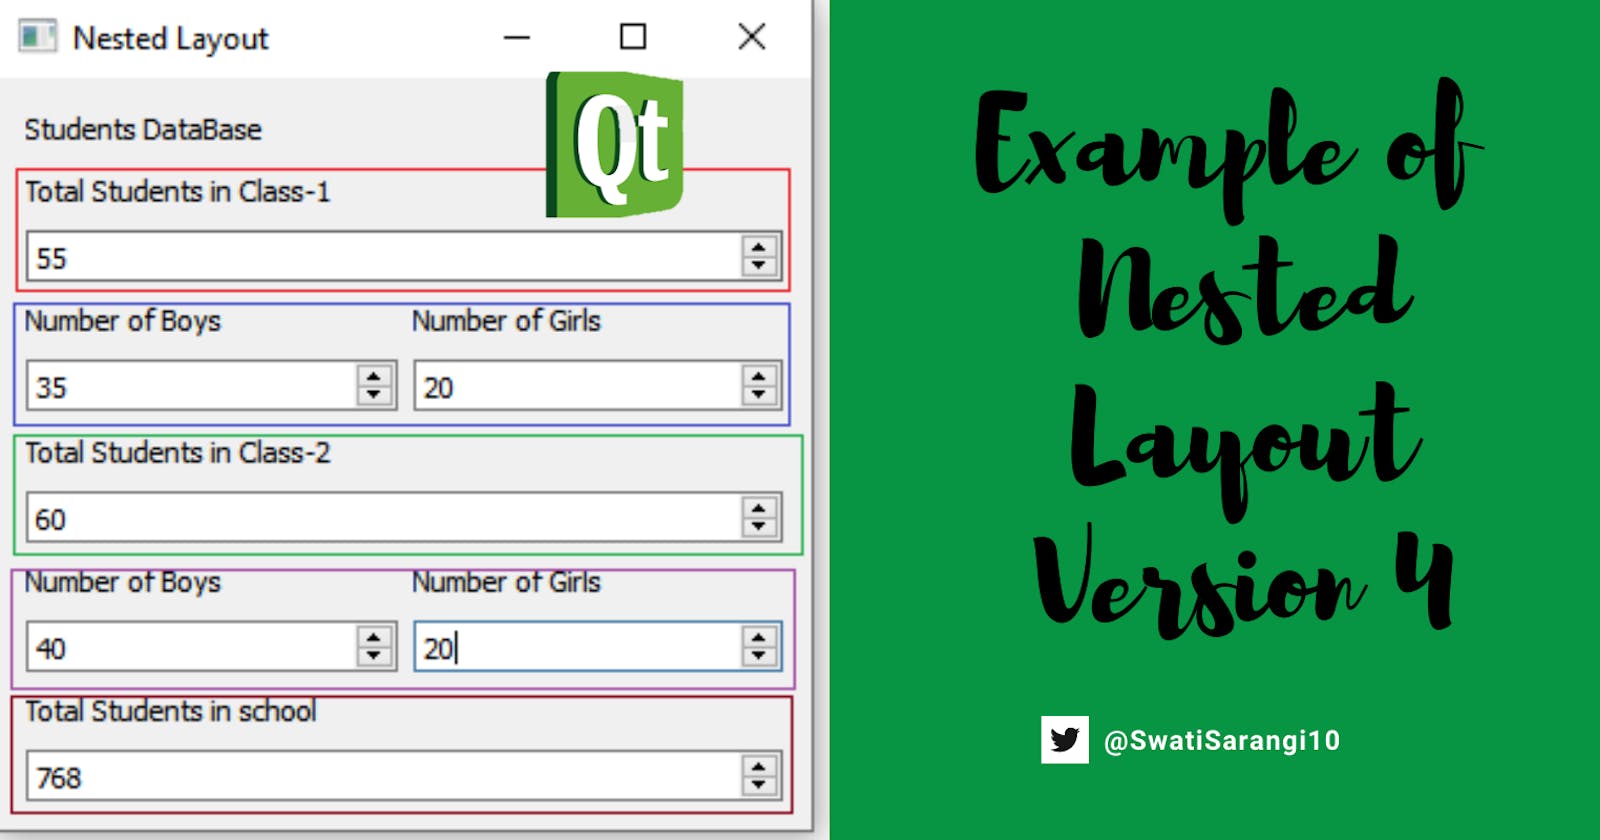
Instead of creating individual widgets and adding them to the main layout;primary layout , then adding this layout to the main widget; primary window ,in the following program,I have created widget units wrapping the heading and data into it, then later adding these units to the layout and then to the window. You have to decide which design out of these two, suits you better.
Take a look at the following figure to get an idea about the widget units that I have referred above:

Codes
nestedlayout.h
#ifndef NESTEDLAYOUT_H
#define NESTEDLAYOUT_H

#include <QMainWindow>
class NestedLayout : public QMainWindow
{
    Q_OBJECT

public:
    NestedLayout(QWidget *parent = nullptr);
};
#endif // NESTEDLAYOUT_H
main.cpp
#include "nestedlayout.h"

#include <QApplication>

int main(int argc, char *argv[])
{
    QApplication a(argc, argv);
    NestedLayout w;
    w.show();
    return a.exec();
}
nestedlayout.cpp
#include "nestedlayout.h"
#include <QWidget>
#include <QLabel>
#include <QVBoxLayout>
#include <QHBoxLayout>
#include <QSpinBox>

NestedLayout::NestedLayout(QWidget *parent)
    : QMainWindow(parent)
{

    QWidget *primaryWindow = new QWidget(this);

    QVBoxLayout *primaryLayout = new QVBoxLayout();

    QLabel *mainHeading = new QLabel("Students DataBase");
 //Widget-1   ; Red
    QVBoxLayout *lay1 =new QVBoxLayout();
    QLabel *lab1 = new QLabel("Total Students in Class-1");
    QSpinBox *spin1 =new QSpinBox();
    lay1->addWidget(lab1);
    lay1->addWidget(spin1);

    //Widget-2  ; Blue
    QHBoxLayout *layh2 =new QHBoxLayout();

    QVBoxLayout *lay2a =new QVBoxLayout();
    QLabel *lab2a = new QLabel("Number of Boys");
    QSpinBox *spin2a =new QSpinBox();
    lay2a->addWidget(lab2a);
    lay2a->addWidget(spin2a);

    QVBoxLayout *lay2b =new QVBoxLayout();
    QLabel *lab2b = new QLabel("Number of Girls");
    QSpinBox *spin2b =new QSpinBox();
    lay2b->addWidget(lab2b);
    lay2b->addWidget(spin2b);

    layh2->addLayout(lay2a);
    layh2->addLayout(lay2b);

    //Widget-3   ; Green
    QVBoxLayout *lay3 =new QVBoxLayout();
    QLabel *lab3 = new QLabel("Total Students in Class-2");
    QSpinBox *spin3 =new QSpinBox();
    lay3->addWidget(lab3);
    lay3->addWidget(spin3);

    //Widget-4 ; Purple
    QHBoxLayout *layh4 =new QHBoxLayout();

    QVBoxLayout *lay4a =new QVBoxLayout();
    QLabel *lab4a = new QLabel("Number of Boys");
    QSpinBox *spin4a =new QSpinBox();
    lay4a->addWidget(lab4a);
    lay4a->addWidget(spin4a);

    QVBoxLayout *lay4b =new QVBoxLayout();
    QLabel *lab4b = new QLabel("Number of Girls");
    QSpinBox *spin4b =new QSpinBox();
    lay4b->addWidget(lab4b);
    lay4b->addWidget(spin4b);

    layh4->addLayout(lay4a);
    layh4->addLayout(lay4b);

    //Widget-5  ; Brown
    QVBoxLayout *lay5 =new QVBoxLayout();
    QLabel *lab5 = new QLabel("Total Students in school");
    QSpinBox *spin5 =new QSpinBox();
    lay5->addWidget(lab5);
    lay5->addWidget(spin5);


    primaryLayout->addWidget(mainHeading);
    primaryLayout->addLayout(lay1);//Widget-1 - Red
    primaryLayout->addLayout(layh2); //Widget-2 - Blue
    primaryLayout->addLayout(lay3); //Widget-3 -Green
    primaryLayout->addLayout(layh4); //Widget-4 - Purple
    primaryLayout->addLayout(lay5); //Widget-5 - Brown
    primaryWindow->setLayout(primaryLayout);

    this->setWindowTitle("Nested Layout");
    QMainWindow::setCentralWidget(primaryWindow);
    this->show();

}
Output
This yields the following result -

I hope that you're now acquainted with various ways to achieve the same design by fidgeting around with layouts.
